Stunning And Easy Drawing Of A Rose: A Beginner's Guide
Drawing a rose doesn’t have to be intimidating. Whether you're a total beginner or just looking to brush up on your skills, this guide is here to help you create stunning and easy rose drawings step by step. Roses are timeless, elegant, and packed with meaning—so why not learn how to bring them to life on paper? Let’s dive in and make art fun!
Let’s face it, roses are more than just flowers—they’re symbols of love, passion, and beauty. But if you’ve ever tried to draw one, you might’ve found yourself staring at your paper wondering, “Where do I even start?” Don’t worry, you’re not alone. Drawing a rose can seem tricky, but with the right approach, it’s totally doable. And guess what? This guide is all about making it easy for you.
From understanding the anatomy of a rose to mastering simple techniques, we’ve got you covered. So grab your pencils, erasers, and a cup of coffee because we’re about to turn those shaky lines into something beautiful. Ready? Let’s go!
- Christopher Russell The Life And Career Of A Talented Actor Unveiled
- Lauren Hashian The Untold Story Behind Dwayne The Rocks Wife
Why Drawing a Rose is Worth Your Time
Before we dive into the nitty-gritty of drawing, let’s talk about why roses are such a big deal in the art world. Roses aren’t just pretty flowers; they carry deep meanings and can add an emotional layer to your artwork. Plus, learning how to draw a rose teaches you valuable skills like shading, texture, and composition. And hey, who doesn’t want to impress their friends with a gorgeous drawing?
Here are a few reasons why roses are worth the effort:
- They’re universally loved and admired
- They’re perfect for practicing realistic details
- You can experiment with different styles, from realistic to abstract
- They’re versatile and can fit into any artistic theme
Getting Started: Materials You Need
Let’s talk about the basics. You don’t need fancy tools to start drawing a rose. In fact, you probably already have everything you need lying around your house. Here’s a quick list of materials that will make your journey smoother:
- Urgent Beef Ramen Recall What You Need To Know Now
- Beware Ramen Noodle Bacteria In 2024 Risks Amp Safety Tips
Tools to Grab
- Pencils (HB, 2B, 4B, and 6B for different shading levels)
- Eraser (a kneaded eraser is great for precision)
- Blending stump or tortillon (optional but helpful)
- High-quality drawing paper
- A reference photo or real rose (if you’ve got one nearby)
Pro tip: Start with a light pencil like HB to sketch your outlines. This way, you can easily erase mistakes without leaving harsh marks on your paper.
Understanding the Anatomy of a Rose
Now, here’s where things get interesting. To draw a stunning rose, you need to understand its structure. Think of it like building a house—you need a strong foundation before adding the details. A rose has several key parts:
- Petals: These are the soft, layered parts that give roses their iconic shape
- Stem: The strong, slightly thorny base that holds everything together
- Leaves: Small, pointed leaves that add balance to the composition
- Bud: The center of the rose where the petals meet
Take some time to study these parts. Notice how the petals overlap, how the stem curves, and how the leaves fan out. The more you observe, the better your drawing will turn out.
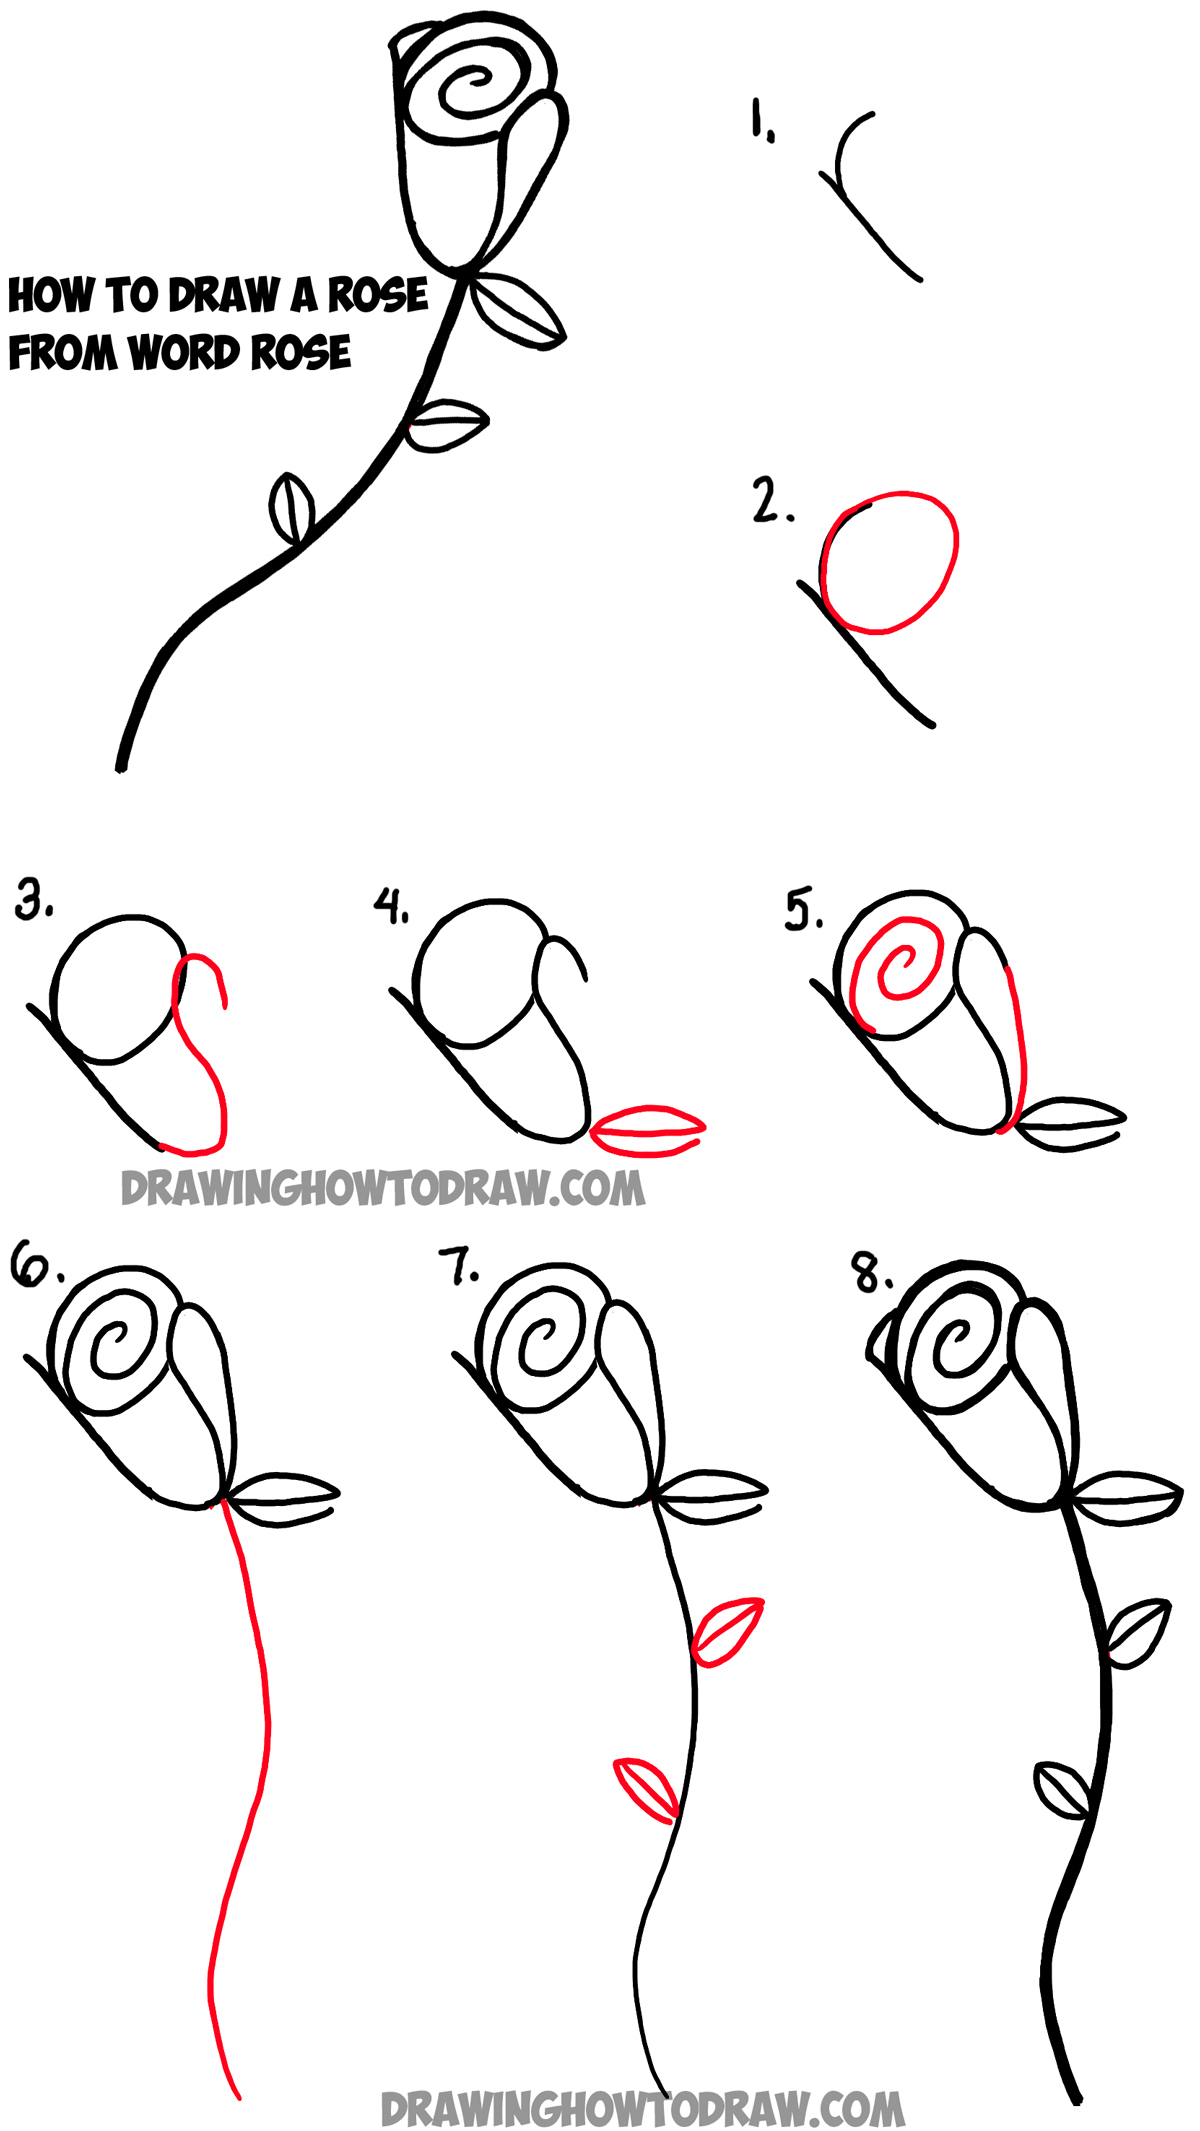
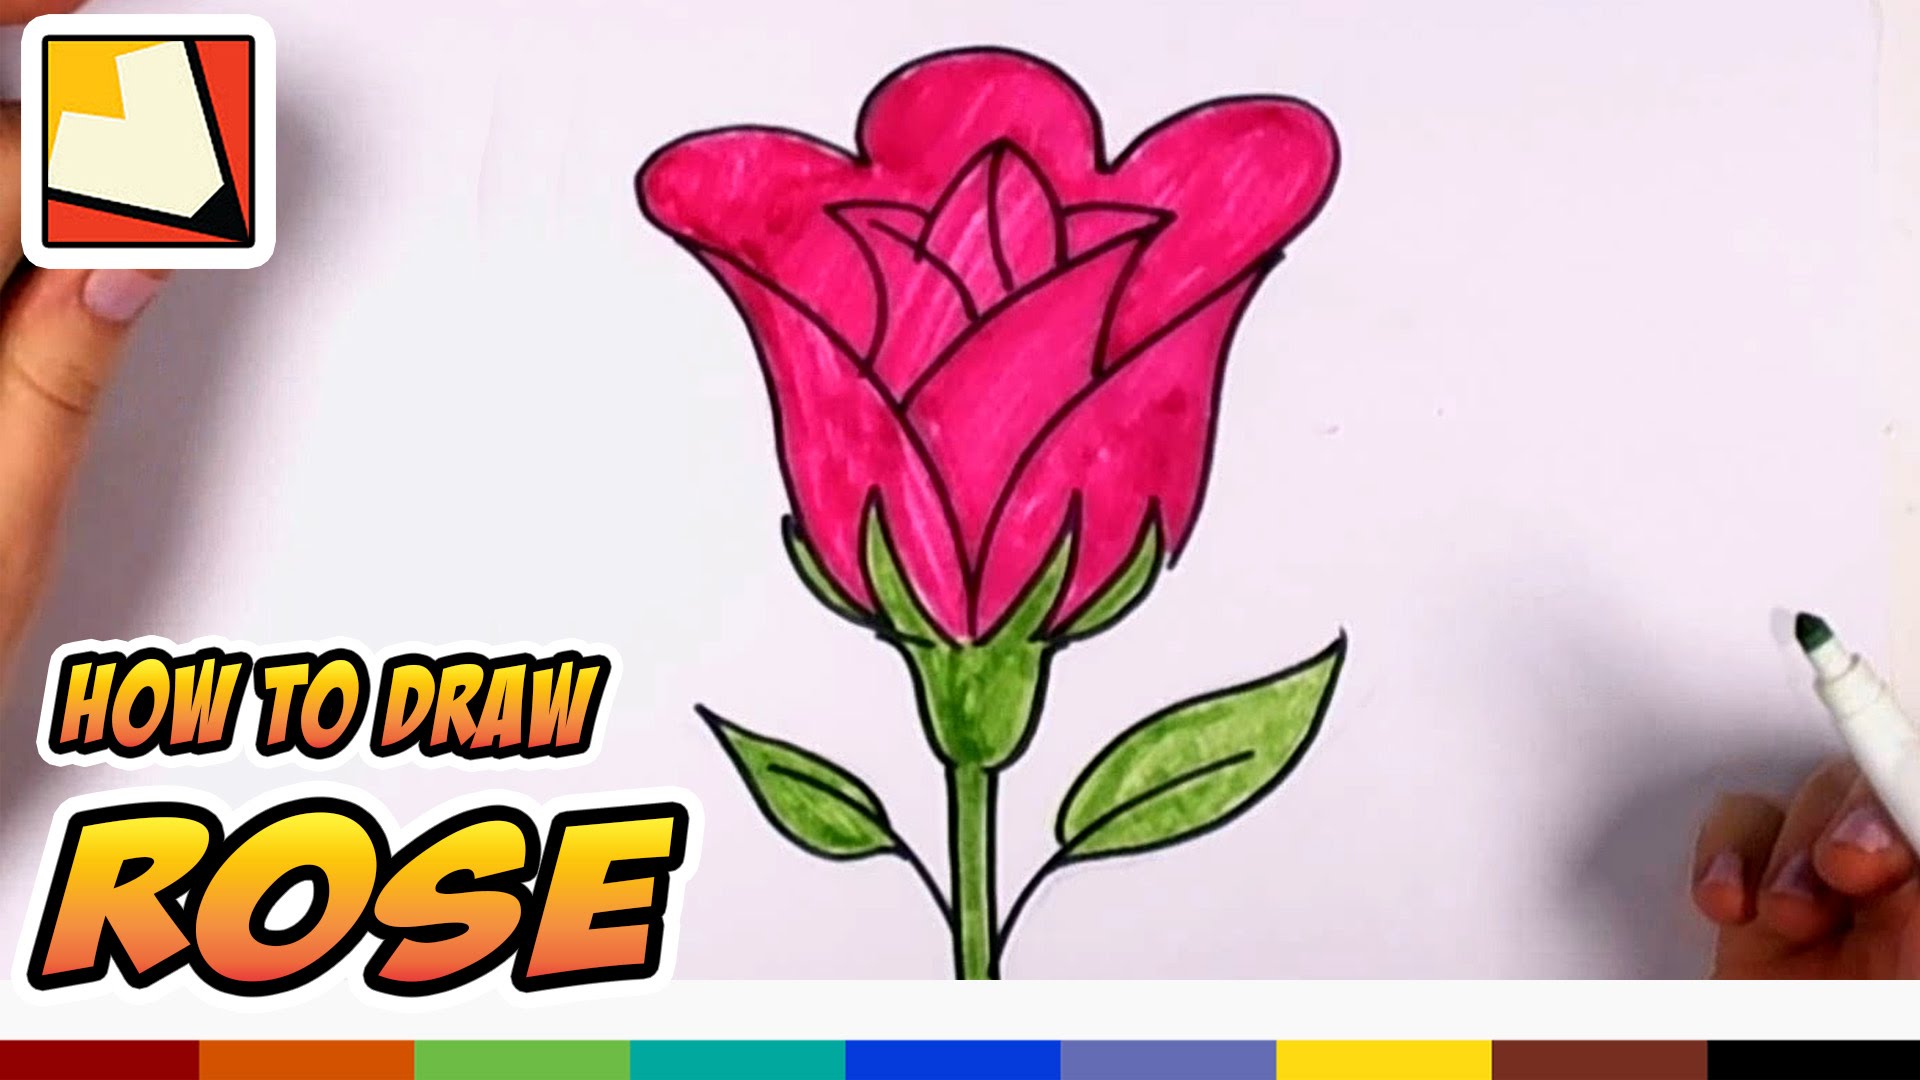
Step-by-Step Guide to Drawing a Rose
Alright, let’s get down to business. Here’s a simple step-by-step guide to drawing a rose that’s both stunning and easy:
Step 1: Sketch the Basic Shape
Start by drawing a small circle for the bud. Then, add a teardrop shape around it to form the base of the rose. Keep your lines light and loose—this is just the foundation.
Step 2: Add Petals
Now it’s time to layer the petals. Begin with the inner petals near the bud and work your way outward. Each petal should curve slightly, giving the rose its natural look. Don’t worry about perfection—roses are naturally imperfect, and that’s part of their charm.
Step 3: Draw the Stem and Leaves
Extend a curved line downward from the base of the rose to create the stem. Add a few thorns along the way for realism. Then, sketch a couple of leaves on either side of the stem. Remember, leaves aren’t perfectly symmetrical, so mix up their shapes for a natural feel.
Step 4: Refine Your Lines
Once you’ve got the basic structure down, go over your sketch with a darker pencil. Erase any unnecessary lines and clean up your drawing. This step is all about making your rose look polished.
Step 5: Add Shading and Texture
This is where your rose really comes to life. Use your blending stump to add shading to the petals, stem, and leaves. Pay attention to light sources—where is the light coming from? This will help you decide where to add darker shadows and lighter highlights.
Common Mistakes to Avoid
Even the best artists make mistakes, but knowing what to watch out for can save you a lot of frustration. Here are a few common pitfalls to avoid when drawing a rose:
- Making all the petals the same size and shape
- Forgetting to add texture to the petals
- Ignoring the thorns on the stem
- Overworking the details and losing the overall shape
Remember, practice makes perfect. If something doesn’t look quite right, take a deep breath and try again. You’ve got this!
Exploring Different Styles of Rose Drawings
Once you’ve mastered the basics, why not experiment with different styles? Here are a few ideas to inspire you:
Realistic Style
This style focuses on capturing every detail of the rose, from the veins in the petals to the texture of the stem. It’s all about patience and precision.
Abstract Style
If you’re feeling bold, try an abstract approach. Use bold lines and colors to create a rose that’s more about emotion than realism.
Minimalist Style
Sometimes, less is more. A minimalist rose drawing can be just as impactful as a detailed one. Focus on clean lines and simple shapes.
Where to Find Inspiration
Art is all about inspiration, and there’s no shortage of it when it comes to roses. Here are a few places to find creative ideas:
- Art galleries and exhibitions
- Instagram and Pinterest accounts dedicated to flower art
- Gardens and parks where you can observe real roses
- Art books and tutorials by professional artists
Don’t be afraid to mix and match styles to create something uniquely yours. After all, art is about self-expression!
Tips for Improving Your Drawing Skills
Whether you’re drawing roses or anything else, these tips will help you improve your skills over time:
- Practice regularly—even 10 minutes a day can make a difference
- Study the work of other artists to learn new techniques
- Keep a sketchbook to track your progress
- Experiment with different mediums, like charcoal or ink
Remember, every great artist started as a beginner. The key is consistency and passion. Keep pushing yourself, and you’ll be amazed at how far you can go.
Final Touches: Adding Your Personal Flair
Once your rose is complete, don’t forget to add your own personal touch. Maybe you want to add a background, incorporate color, or even frame your drawing. Whatever you choose, make it yours. Art is all about expressing yourself, so don’t be afraid to let your creativity shine.
Conclusion: Your Journey Starts Here
And there you have it—a stunning and easy guide to drawing a rose for beginners. Whether you’re drawing for fun or hoping to develop your skills, remember that every stroke of your pencil is a step forward. Don’t be discouraged by mistakes—they’re part of the learning process.
Now it’s your turn to take action. Grab your materials, find a quiet spot, and start drawing. And when you’re done, share your masterpiece with the world. Who knows? You might inspire someone else to pick up a pencil and start their own artistic journey.
Until next time, keep creating, keep exploring, and most importantly, keep having fun!
Table of Contents
- Stunning and Easy Drawing of a Rose: A Beginner's Guide
- Why Drawing a Rose is Worth Your Time
- Getting Started: Materials You Need
- Understanding the Anatomy of a Rose
- Step-by-Step Guide to Drawing a Rose
- Common Mistakes to Avoid
- Exploring Different Styles of Rose Drawings
- Where to Find Inspiration
- Tips for Improving Your Drawing Skills
- Final Touches: Adding Your Personal Flair
- Unlock Stock Success A Deep Dive Into 5starsstockscom Materials Guide
- Tara Reid The Untold Story Behind Her Fame Then And Now

How to Draw a Red Rose Step by Step Guide
Rose Drawing Steps Beginners at Explore collection
Rose For Beginners Drawing at Free for personal use
